Managing Touchpoints
Once you’ve created touchpoints, effective management helps you stay organized and optimize performance. This guide covers the essential tasks you’ll need to manage your touchpoints successfully.Touchpoints Dashboard Overview
Finding Your Touchpoints
Navigate to Touchpoints in the main menu to see all your marketing touchpoints in one place. What You’ll See:- Touchpoint List: All your touchpoints with names, links, and status
- Search Bar: Find specific touchpoints quickly
- Filter Options: Filter by tags, creation date, or status
- Create Button: Add new touchpoints
- Touchpoint name and short link
- Active/inactive status
- Applied tags
- Creation date
- Creator name
- Quick performance metrics
Organizing with Tags
Creating and Using Tags
Tags help you organize touchpoints by campaign, channel, or any category that makes sense for your workflow.1
Create tags
Go to Tags in the main menu and click ”+ Create Tag”.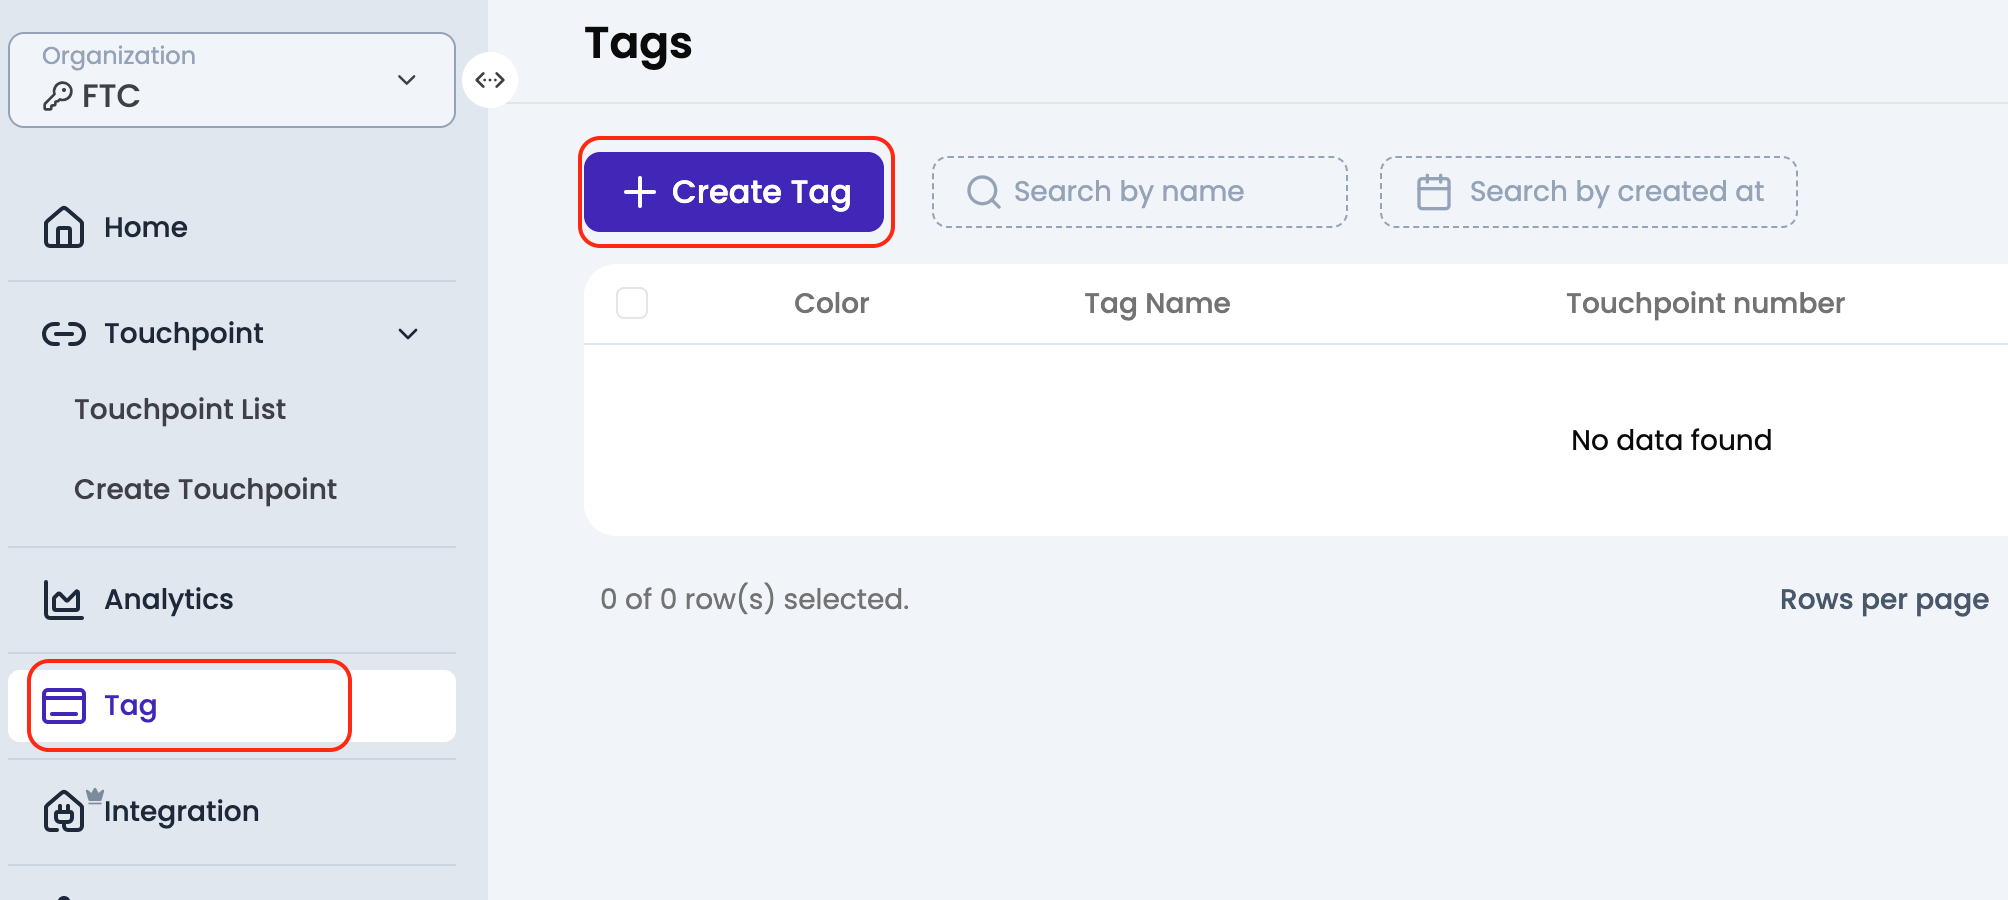
- Campaign names:
summer-2025,product-launch - Channels:
social-media,email,print - Content types:
landing-pages,demos,resources
2
Apply tags to touchpoints
When creating or editing touchpoints, add relevant tags in the Tag field.You can add multiple tags to organize touchpoints in different ways.
3
Filter by tags
Use the filter options in the touchpoints list to show only touchpoints with specific tags.This makes it easy to review campaign performance or find related touchpoints.
Tagging Best Practices
Keep It Simple
Use clear, consistent tag names that your team will understand and remember.
Plan Your System
Decide on tag categories before creating many touchpoints to stay organized.
Editing Touchpoints
Making Changes
1
Access touchpoint details
Click on any touchpoint from the list to open its detail page.You’ll see three tabs: Analytics, Details, and Advanced.
2
Edit basic information
In the Details tab, you can update:
- Name: Change the touchpoint name
- Destination URL: Update where the touchpoint redirects
- Tags: Add or remove organizational tags
- Description: Add notes about the touchpoint’s purpose
3
Modify short links
Click the edit icon next to your short link to customize the back-half.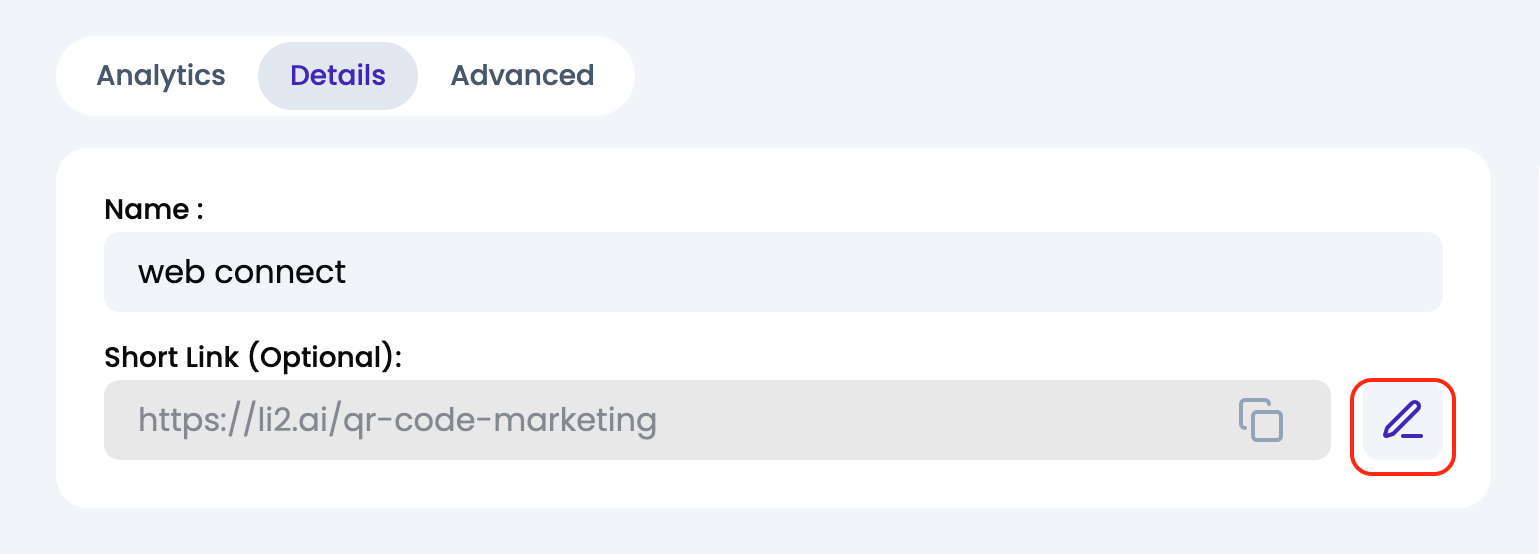
4
Manage channels
Toggle LINK and QR channels on or off based on your distribution needs.
- LINK: For digital sharing (social media, email, websites)
-
QR: For physical materials (print ads, business cards, signage)

When to Edit Touchpoints
Update destination content
Update destination content
Change the destination URL when you have:
- New landing pages or updated content
- Seasonal campaign updates
- A/B testing different pages
- Fixed broken or outdated links
Improve organization
Improve organization
Update names and tags when you need to:
- Better organize growing campaigns
- Align with team naming conventions
- Improve searchability and filtering
- Prepare for campaign reviews
Optimize performance
Optimize performance
Edit touchpoints based on analytics insights:
- Poor-performing destinations need updates
- Social media optimization improvements
- UTM parameter adjustments
- Channel strategy changes
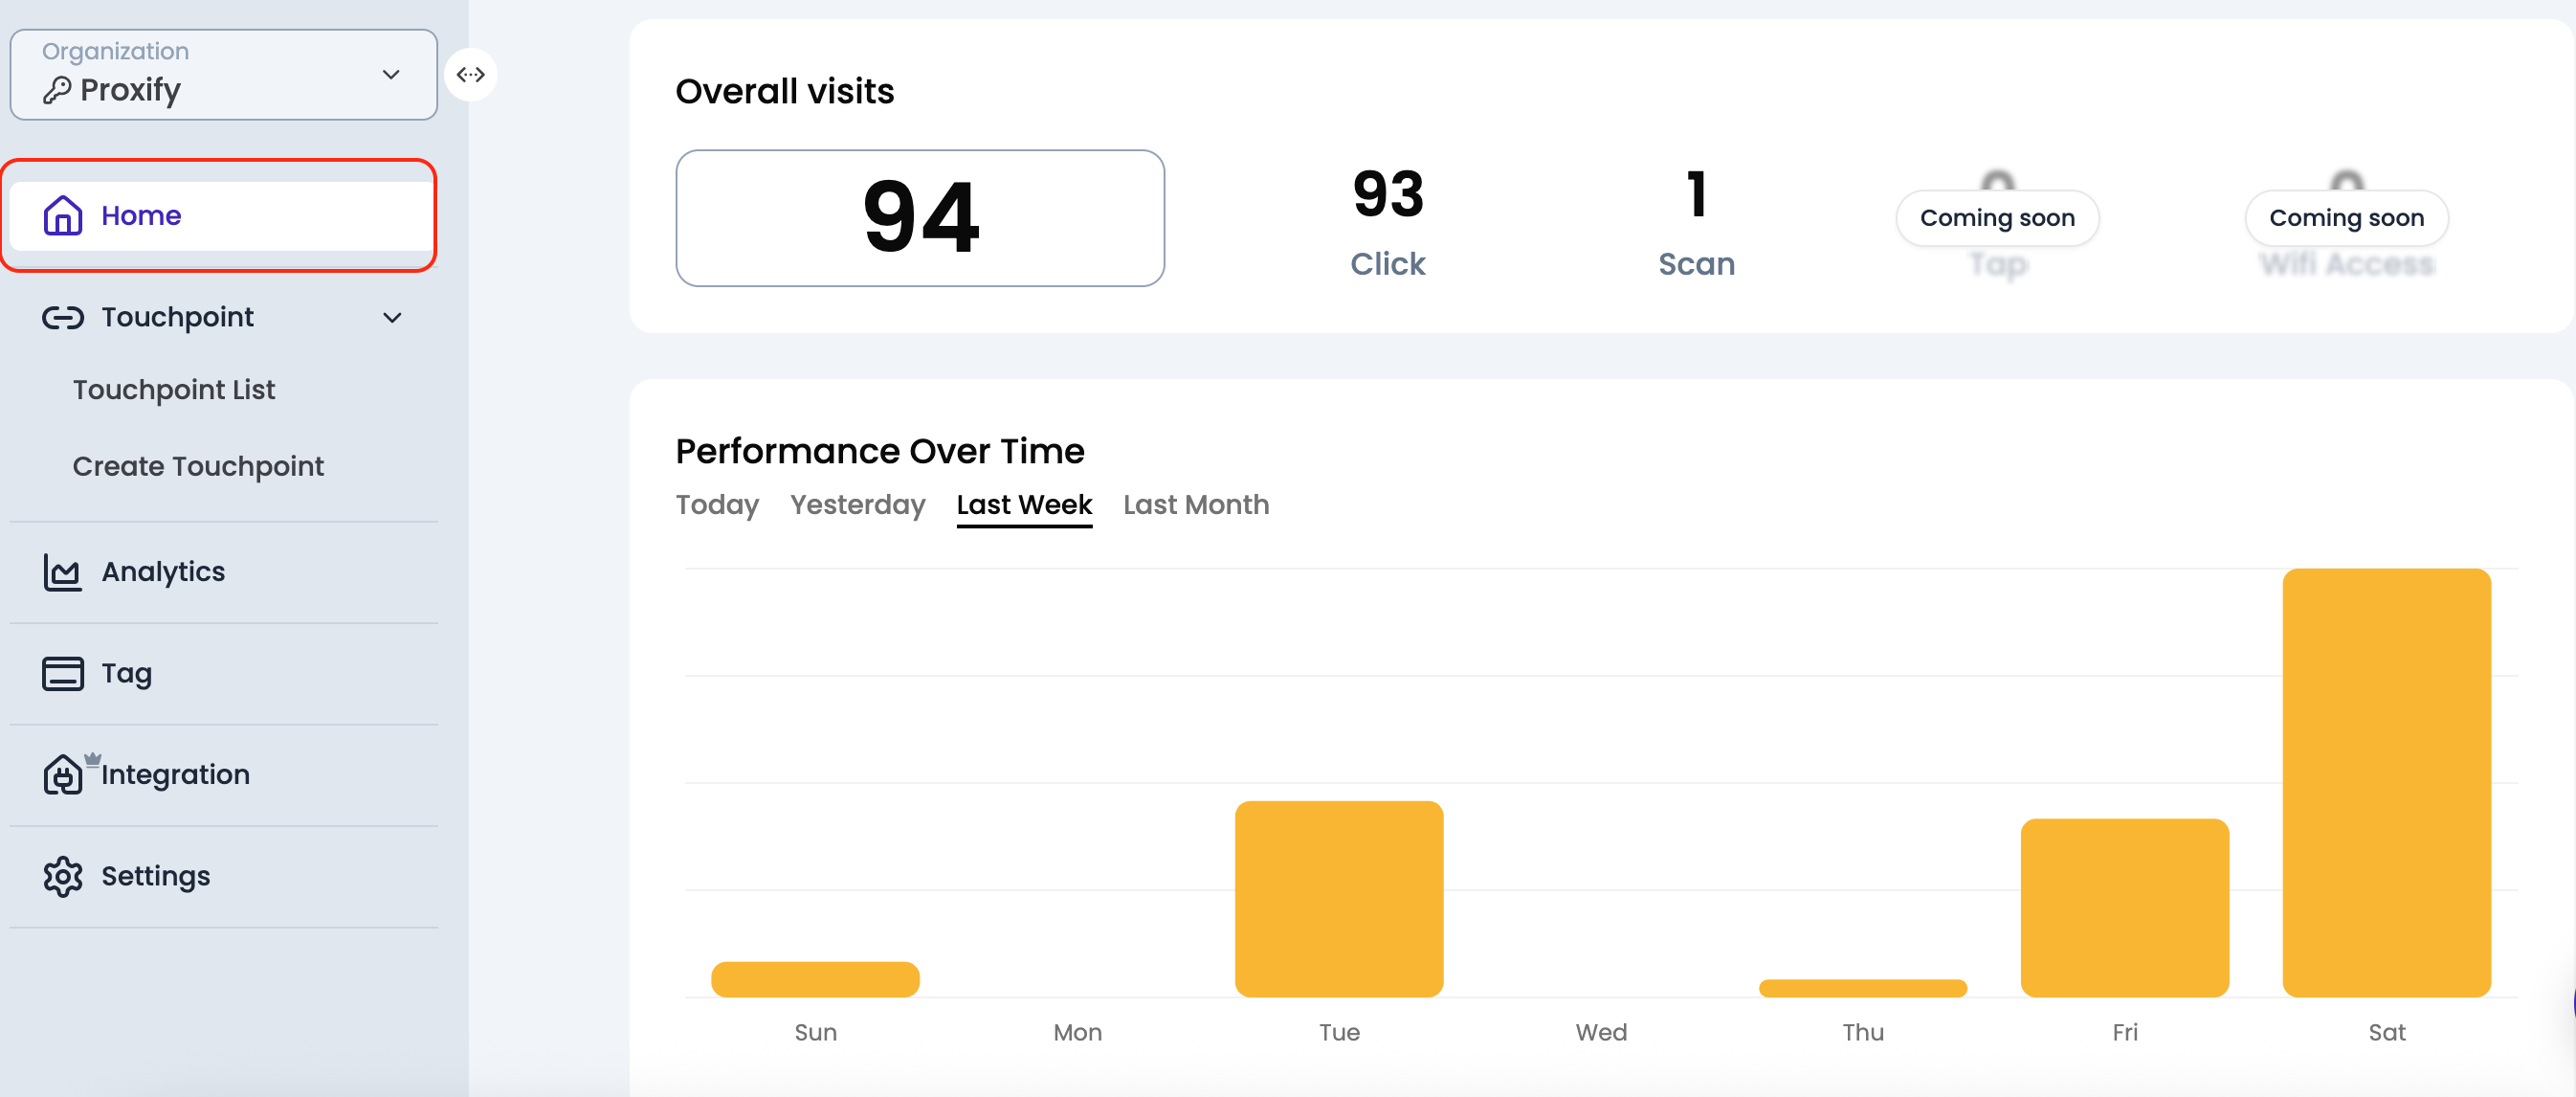
Monitoring Performance
Quick Performance Check
1
Dashboard overview
Your main dashboard shows:
- Total clicks and scans across all touchpoints
- Performance trends over time
-
Top-performing touchpoints
2
Individual touchpoint analytics
Click on any touchpoint and go to the Analytics tab to see:
- Total clicks and scans
- Performance by channel (LINK vs QR)
- Geographic data
-
Performance timeline

3
Compare performance
Use tags to filter and compare similar touchpoints:
- Campaign performance comparison
- Channel effectiveness analysis
- Content type success rates
Simple Performance Optimization
Test Different Destinations
Try different landing pages to see what performs better with your audience.
Optimize High-Traffic Touchpoints
Focus improvement efforts on touchpoints that already get good traffic.
Review Low Performers
Check if underperforming touchpoints have issues or need updates.
Use Both Channels
Enable both LINK and QR channels to reach audiences across digital and physical touchpoints.
Managing Touchpoint Status
Active and Inactive Status
Active touchpoints
Active touchpoints
What it means: Touchpoint is fully functional and tracking analyticsWhen to use:
- Currently running campaigns
- Permanent links (like bio links)
- Ongoing marketing materials
Inactive touchpoints
Inactive touchpoints
What it means: Touchpoint still works but may not be actively promotedWhen to use:
- Completed campaigns you want to keep for reference
- Seasonal campaigns that aren’t currently running
- Touchpoints being updated or optimized
Managing Touchpoint Lifecycle
1
Campaign launch
- Verify all touchpoints work correctly
- Test links and QR codes
- Confirm analytics are tracking
- Share with your team
2
During campaigns
- Monitor performance regularly
- Update content as needed
- Respond to any technical issues
- Track toward campaign goals
3
Campaign completion
- Review final performance
- Update status to inactive if appropriate
- Document what worked well
- Archive or repurpose successful touchpoints
Search and Organization Tips
Finding Touchpoints Quickly
Use Search
Search by touchpoint name, URL, or tag to find what you need quickly.
Filter by Date
Use date filters to find recently created touchpoints or older campaigns.
Filter by Status
Show only active or inactive touchpoints to focus on current campaigns.
Combine Filters
Use multiple filters together for precise results (e.g., active + specific tag).
Staying Organized
1
Develop naming conventions
Use consistent patterns like:
Campaign-Name-Content-Type(e.g., “Summer-Launch-Landing-Page”)Date-Campaign-Channel(e.g., “Q3-Webinar-Social”)Team-Purpose-Version(e.g., “Sales-Demo-V2”)
2
Regular cleanup
- Review touchpoints monthly
- Archive completed campaigns
- Update outdated content
- Remove unused or broken touchpoints
3
Team coordination
- Agree on tagging standards with your team
- Document naming conventions
- Share important touchpoints with relevant team members
- Review campaign performance together
Common Management Tasks
Updating campaign content
Updating campaign content
- Go to touchpoint details
- Update destination URL to new content
- Test the new destination works
- Update touchpoint name/description if needed
- Monitor performance after the change
Organizing existing touchpoints
Organizing existing touchpoints
- Review current touchpoints and identify patterns
- Create relevant tags for organization
- Apply tags to existing touchpoints
- Update names for consistency
- Use filters to verify organization works
Preparing for campaign reviews
Preparing for campaign reviews
- Use tags to filter campaign-specific touchpoints
- Review performance data for each touchpoint
- Note high and low performers
- Document insights and recommendations
- Plan optimization actions
Next Steps
Advanced Social Optimization
Learn to optimize touchpoints for social media sharing with custom meta tags and images.
Analytics Deep Dive
Explore detailed analytics and UTM parameter tracking for better campaign insights.
Multi-Channel Routing
Set up different destinations for LINK and QR channels for advanced testing.
QR Code Customization
Customize QR code design and download options for professional marketing materials.
Need help with touchpoint management? Contact support → or visit your dashboard →